Cloudflare Data Platform with Mach5 Search
This document explains how to integrate Cloudflare’s R2 Data Platform with Mach5 Search to enable seamless analytics and search on Apache Iceberg tables stored in R2.
Creating an Iceberg Table using the R2 Data Catalog
Creating an Apache Iceberg table in Cloudflare involves using Cloudflare R2 Data Catalog, which is a managed Apache Iceberg catalog built directly into an R2 bucket.
Here are the general steps to create and use an Iceberg table in Cloudflare:
Enable R2 Data Catalog on an R2 Bucket
You need an R2 bucket to store your data and the Iceberg metadata.
- Create an R2 Bucket if you don’t have one.
- Enable the Data Catalog on that R2 bucket. This turns on the REST catalog interface required by Iceberg clients and manages the Iceberg metadata.
You can typically do this via the Cloudflare Dashboard:
- Go to R2 Object Storage.
- Select the bucket you want to use.
- Go to the Settings tab.
- Find R2 Data Catalog and select Enable.
Alternatively, you can use the Cloudflare Wrangler CLI tool:
npx wrangler r2 bucket catalog enable <YOUR_BUCKET_NAME>
Upon enabling, you will get a Catalog URI and Warehouse name, which you’ll need for your Iceberg query engine.
Create an API Token
To connect an external Iceberg engine (like PyIceberg, Spark, or Trino) to the R2 Data Catalog, you need an API token with appropriate permissions for both R2 Data Catalog and R2 storage.
- Create an API token in the Cloudflare Dashboard with the necessary R2 Data Catalog and R2 Storage permissions (e.g., Admin Read & Write).
Connect an Iceberg Engine and Create the Table
Once the catalog is enabled and you have your credentials (Catalog URI, Warehouse name, and API Token), you can use an Iceberg-compatible query engine or library (like PyIceberg) to define and create the table.
Python snippet to create an Iceberg table
Sample script: (Creates a table my_new_iceberg_table(id integer))
import pyarrow as pa
from pyiceberg.catalog.rest import RestCatalog
# pip install pyiceberg pyarrow --upgrade
# Replace with your actual values
WAREHOUSE = "warehouse_name"
TOKEN = "token"
CATALOG_URI = "https://catalog.cloudflarestorage.com/account_id/catalogname"
# 1. Connect to R2 Data Catalog
catalog = RestCatalog(
    name="m5catalog",
    warehouse=WAREHOUSE,
    uri=CATALOG_URI,
    token=TOKEN,
)
# 2. (Optional) Create a namespace (database)
try:
    catalog.create_namespace("default")
except Exception as e:
    print(f"Namespace might already exist: {e}")
# 3. Define the schema for your Iceberg table
my_schema = pa.schema([
    pa.field("id", pa.int32())
])
# 4. Create the Iceberg table
table_identifier = ("default", "my_new_iceberg_table")
table = catalog.create_table(
    table_identifier,
    schema=my_schema,
    # Optional: Specify partitioning strategy
    # partition_spec=pyiceberg.spec.PartitionSpec( ... )
)
print(f"Iceberg table '{table_identifier}' created successfully.")
Python snippet to insert data into the Iceberg table created above
Sample script: (Sample data added into the id column of the table - 101, 102, 103)
import pyarrow as pa
from pyiceberg.catalog.rest import RestCatalog
from datetime import datetime

# --- 1. Define your Cloudflare R2 Data Catalog connection details ---
# NOTE: Replace these placeholder values with your actual credentials
WAREHOUSE = "warehouse_name"
TOKEN = "token"
CATALOG_URI = "https://catalog.cloudflarestorage.com/account_id/catalogname"

TABLE_IDENTIFIER = ("default", "my_new_iceberg_table") # Adjust namespace and table name if needed

# --- 2. Connect to R2 Data Catalog ---
catalog = RestCatalog(
    name="m5catalog",
    warehouse=WAREHOUSE,
    uri=CATALOG_URI,
    token=TOKEN,
)

# --- 3. Load the Iceberg Table ---
try:
    table = catalog.load_table(TABLE_IDENTIFIER)
    print(table.schema().as_arrow())
    print(f"Successfully loaded Iceberg table: {TABLE_IDENTIFIER}")
except Exception as e:
    print(f"Error loading table: {e}")
    # Handle the case where the table might not exist or connection fails
    exit()

# --- 4. Prepare the Data using PyArrow ---
data = [
    {
        "id": 101
    },
    {
        "id": 102
    },
    {
        "id": 103
    }
]

# Convert the Python list of dictionaries to a PyArrow Table.
# IMPORTANT: The column names and data types in the PyArrow table MUST
# match the schema you defined when you created the Iceberg table.
arrow_table = pa.Table.from_pylist(data, schema=table.schema().as_arrow())
print(arrow_table)
# --- 5. Insert the Data (Append to the table) ---
print(f"Inserting {len(arrow_table)} records...")
table.append(arrow_table)
print("Data insertion complete and transaction committed to R2 Data Catalog.")

# --- 6. (Optional) Verify the data was written ---
# This step requires an active PyIceberg version with read support and Arrow/Pandas integration.
try:
    df = table.scan().to_pandas()
    print("\nData after insertion:")
    print(df)
except Exception as e:
    print(f"\nCould not read data for verification (read requires specific dependencies/setup): {e}")
Generating AWS Access Credentials for the R2 Object Storage Bucket
The Access Key ID and Secret Access Key for Cloudflare R2 are generated as an R2 API Token within your Cloudflare dashboard.
Crucial Warning: The Secret Access Key is shown only once, immediately after creation. You must copy and save it securely at that time, as you cannot retrieve it later.
Here is the step-by-step process:
Log in and Navigate to R2
- Log in to your Cloudflare Dashboard.
- In the left-hand sidebar, click on R2 Object Storage.
- On the R2 Overview page, look to the right side of the screen for the Manage R2 API Tokens section.
- Click on the Manage R2 API Tokens link/button.
Create the API Token
- Click the Create API Token button.
- Give the Token a Name (e.g., “cloudflare-s3-access”). A descriptive name helps you manage tokens later.
- Set Permissions: Select Admin Read & Write.
- Click Create API Token.
Retrieve and Save the Keys
After clicking “Create API Token,” you will be shown the new credentials in a pop-up or on the next screen:
- Access Key ID (This is your public key, like an S3 Key ID).
- Secret Access Key (This is your sensitive secret key).
IMMEDIATELY COPY AND SAVE BOTH OF THESE KEYS SECURELY.
If you navigate away from this page, the Secret Access Key will be hidden forever. If you lose it, you will have to revoke the token and generate a new one.
Locate your Account ID
You will also need your Cloudflare Account ID to build the full R2 endpoint URL.
- You can usually find your Account ID in the lower right-hand corner of your Cloudflare Dashboard’s home or overview page, under the API section, or by clicking “Use R2 with APIs” in the API tokens section.
Once you have the Access Key ID, Secret Access Key, and Account ID, you have everything you need to connect through AWS SDK to R2.
Reference
https://developers.cloudflare.com/r2/examples/aws/aws-cli/
Connect Mach5 to your Cloudflare Iceberg Catalog
Adding Mach5 to your Cloudflare stack unlocks a whole new class of applications and workflows that are simply not feasible with SQL-based analytics alone. It closes the gap between data-at-rest and data-in-use.
To connect Mach5 to your R2 Data Catalog, you would need to create two connections in Mach5; one to the R2 Object Storage where the Iceberg table data and metadata resides, and the other to the Rest endpoint defined for this catalog.
Prerequisites
- Mach5 has been successfully deployed, and for this example, we’ll assume the Mach5 Administrative UI is accessible at http://mach5host:mach5port/
- The Store, Store Route and Warehouse entities that are required to get started with Mach5 Search have been created successfully. For more details, refer to Quickstart guide.
Configure Connections in Mach5
To enable R2/Iceberg integration, two connections need to be configured: one for accessing the object storage layer and another for accessing the REST R2 Data catalog.
R2 Object Storage Connection
This connection will target the R2 object storage bucket containing the underlying data files and metadata for an Iceberg table. As this storage is compatible with the S3 API, we will establish an S3 connection to access it.
Steps for the S3 connection creation:
- Create a secret to store the AWS Secret Access Key which we generated earlier. Store the credentials in a secret file, say cloudflare-s3-secret.yaml as follows.
# File cloudflare-s3-secret.yaml
apiVersion: v1
kind: Secret
metadata:
  name: cloudflare-s3-secret
data:
  key: cGFzc3dvcmQ= #password , Change this value to your base64 encoded AWS Secret Access Key value.
- Apply the changes to create the secret using:
kubectl apply -f cloudflare-s3-secret.yaml -n mach5
- From the Mach5 Administrative UI Home page, click on Connections from the left pane.
- On the Connections page, click on the + icon on the top right corner to create a new connection.
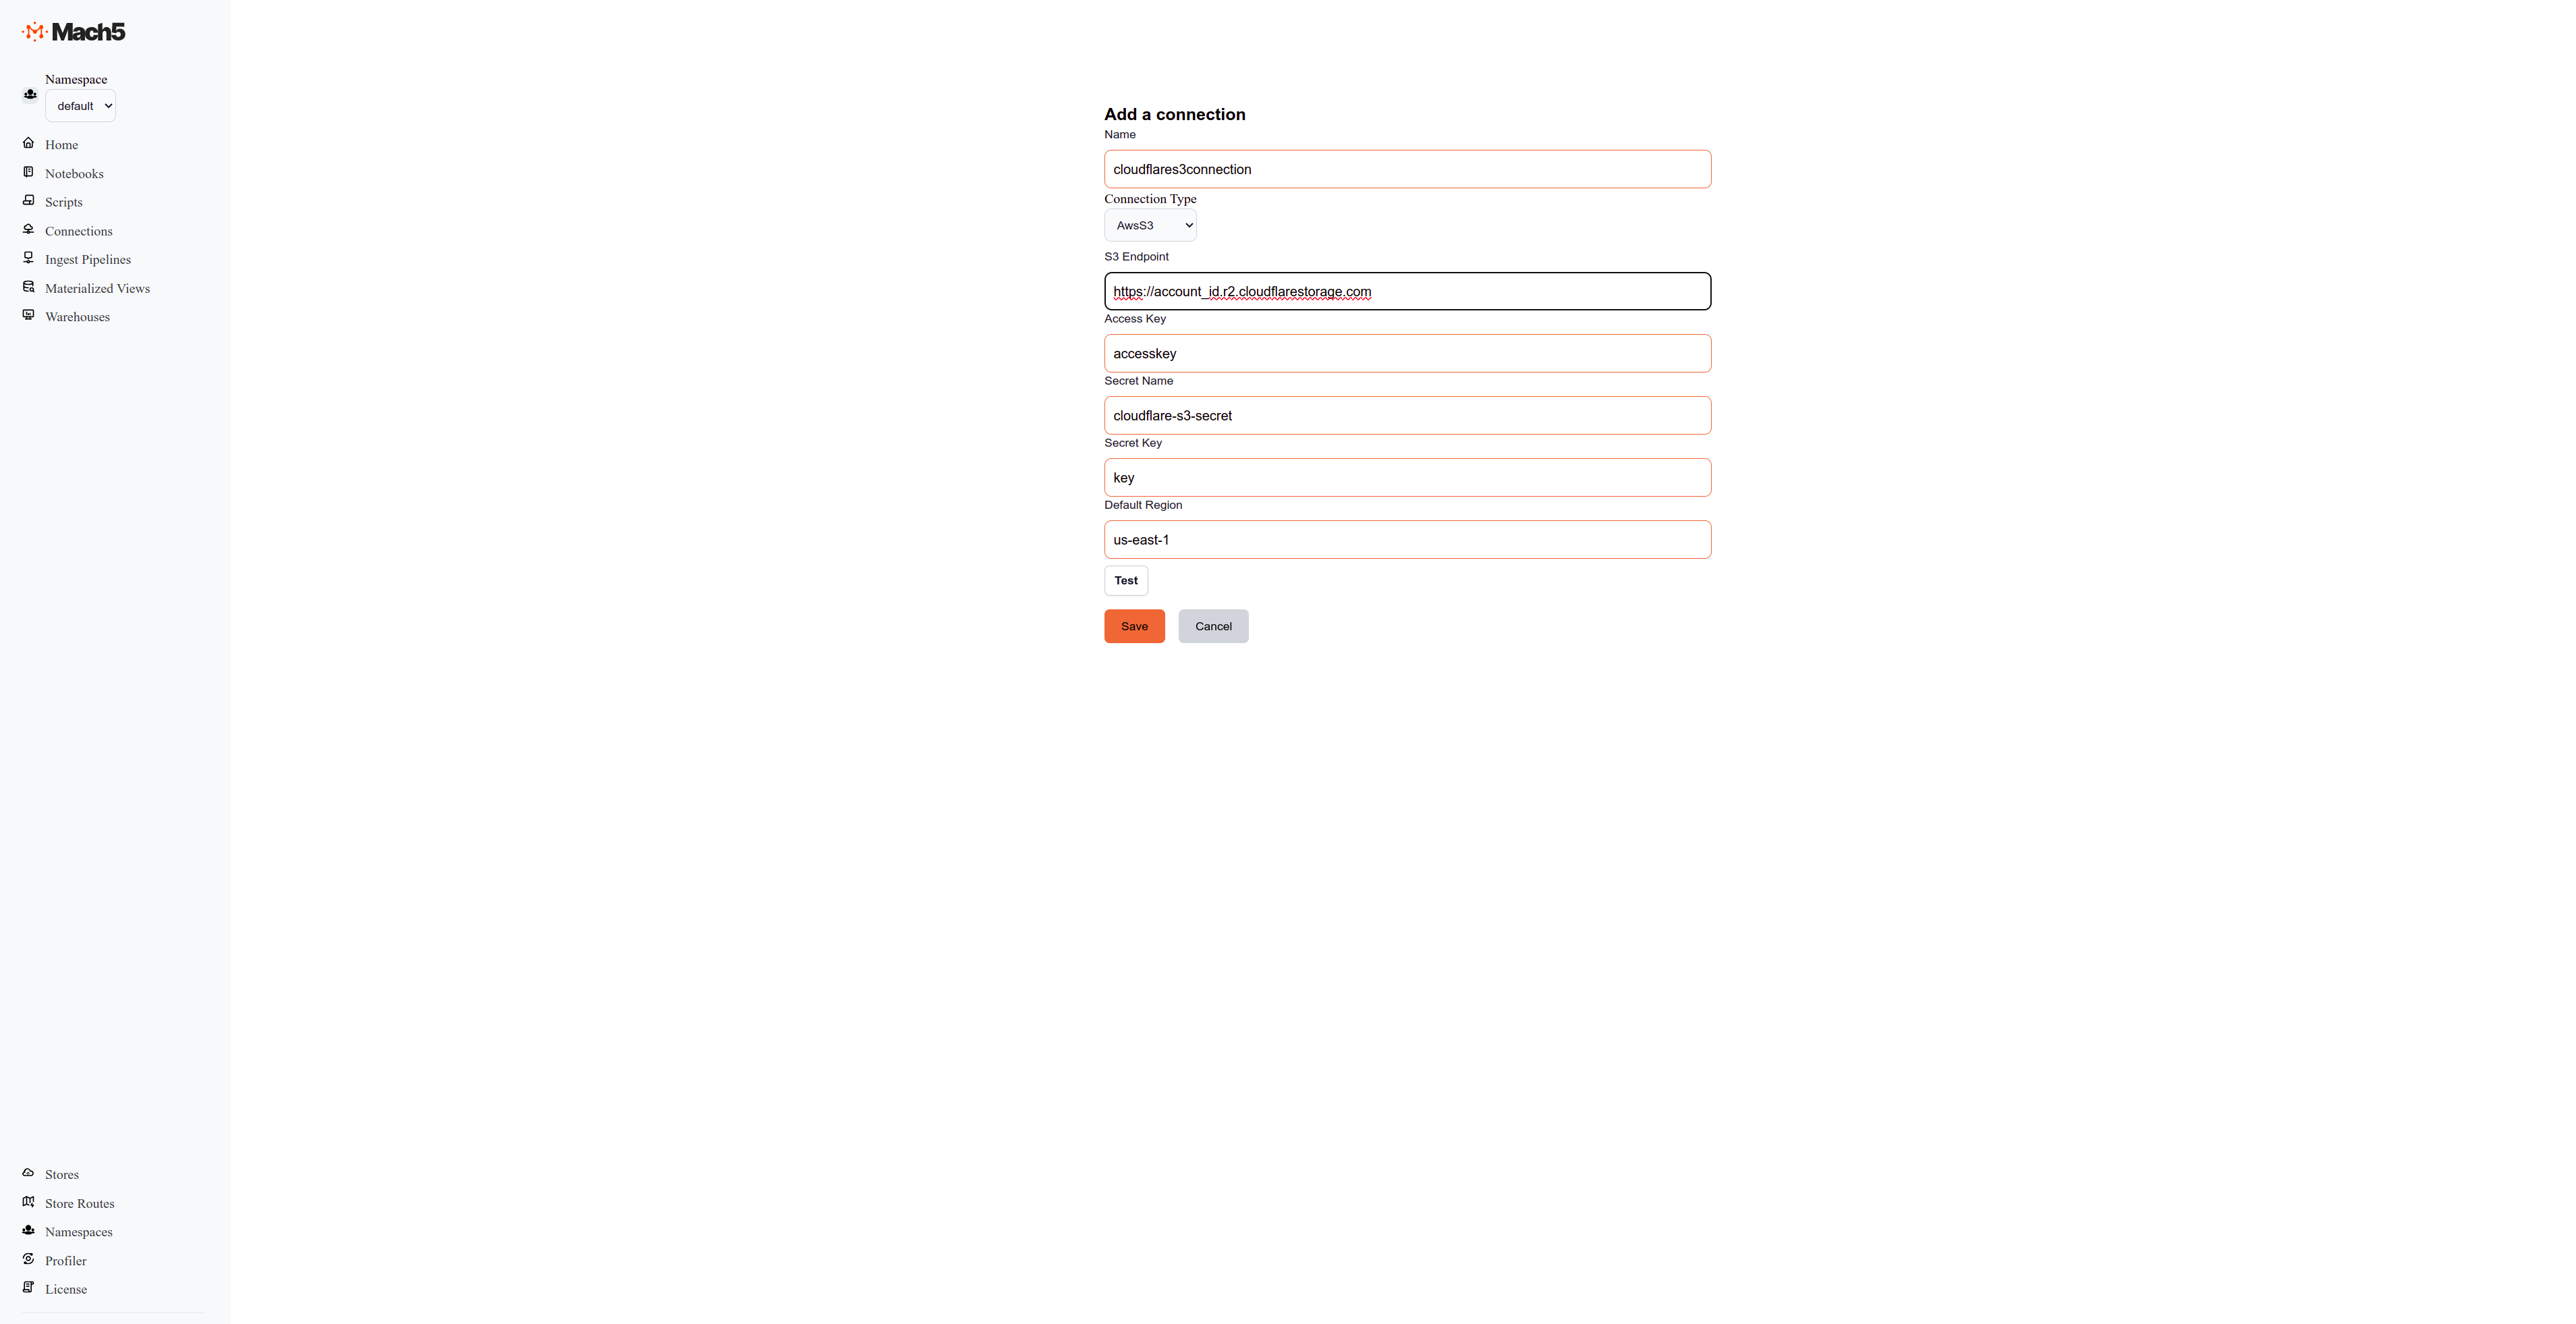
- Configure a new connection by specifying the following:
- Name: Provide a name for the connection, for e.g., cloudflares3connection.
- ConnectionType: Choose AwsS3 as the connection type.
- S3 Endpoint: Specify the S3 endpoint URL, for e.g., https://account_id.r2.cloudflarestorage.com
- Access Key: The AWS Access Key that we generated earlier.
- Secret Name: The name of the secret that we created above, say cloudflare-s3-secret.
- Secret Key: Key specified in the secret, say key.
- Default region: Specify the AWS region as us-east-1.
- Continue to Save this connection.
- Configure a new connection by specifying the following:
R2 Catalog Connection
This connection configures the endpoint for accessing the Iceberg R2 Data catalog.
Steps to create an Iceberg R2 Data Catalog connection:
- Create a secret to store the API token. Store these credentials in a secret file, say cloudflare-token-secret.yaml as follows.
# File cloudflare-token-secret.yaml
apiVersion: v1
kind: Secret
metadata:
  name: cloudflare-token-secret
data:
  key: cGFzc3dvcmQ= #password , Change this value to your base64 encoded API token to access the R2 Data Catalog
- From the Mach5 Administrative UI Home page, click on Connections from the left pane.
- On the Connections page, click on the + icon on the top right corner to create a new connection.
- Configure a new connection by specifying the following:
- Name: Provide a name for the connection, for e.g., cloudflareconnection.
- ConnectionType: Choose Iceberg as the connection type.
- Rest Endpoint: Specify the Catalog URL, e.g., https://catalog.cloudflarestorage.com/account_id/catalogname
- Connection Name: Choose the previously created S3 connection from the dropdown menu.
- Warehouse: Name of the warehouse in the catalog, e.g., accountID_catalogname.
- Token Secret Name: The name of the secret that we created above, say cloudflare-token-secret.
- Token Secret Key: Key specified in the secret, say key.
- Custom Property Key: Specify the key as X-Iceberg-Access-Delegation.
- Custom Property Value: Specify the value as vended-credentials.
- Click on the Add button to add the custom property key and value pair.
- Click on Test to check the connectivity. If this succeeds, continue to Save this connection.
- Configure a new connection by specifying the following:

Configure Ingest Pipelines to index data into Mach5
Mach5 Search ingest pipelines allow you to process and ingest documents from various different sources like Iceberg, Kafka, S3, etc. This is useful for transforming, enriching, or modifying data at ingestion time.
Mach5 Index creation
Create an index in Mach5 called cloudflareindex for the above iceberg table using the following:
curl -XPUT http://mach5host:mach5port/warehouse/default/<warehousename>/opensearch/cloudflareindex -H "Content-Type: application/json" -d '{}'
Ingest pipeline creation
Click on Ingest Pipelines on the left panel of Mach5 UI. This opens the following page:
Steps to create an Iceberg Ingest pipeline:
- From the Mach5 Administrative UI Home page, click on Ingest Pipelines from the left pane.
- On the Ingest Pipelines page, click on the + icon on the top right corner to create a new ingest pipeline.
- Configure a new ingest pipeline by specifying the following:
- Name: Provide a name for the ingest pipeline, for e.g., cloudflare-ip
- Index: Name of the mach5 index created above, e.g., cloudflareindex
- Transform Type: None
- Connection Name: Select the Iceberg connection, cloudflareconnection from the dropdown menu.
- Ingest Pipeline Type: Select the pipeline type as Iceberg from the dropdown menu.
- Database: Name of the Iceberg database, e.g., default
- Table: Name of the Iceberg table, e.g., my_new_iceberg_table
- Leave the advanced section unchanged.
- Click on Save to create the ingest pipeline.
- Once the ingest pipeline is created, records will start appearing in the Mach5 index corresponding to the iceberg table.
Verify data ingestion
- Execute a count query on the Mach5 index to verify the number of indexed records.
curl http://mach5host:mach5port/warehouse/default/<warehousename>/opensearch/cloudflareindex/_count

{"count":3,"_shards":{"total":1,"successful":1,"skipped":0,"failed":0}}
- Execute a search query on the Mach5 index to verify the ingested records.
curl -XPOST http://mach5host:mach5port/warehouse/default/<warehousename>/opensearch/cloudflareindex/_search -H "Content-Type: application/json" -d '{}'

{
  "took": 2,
  "timed_out": false,
  "_shards": {"total": 1, "successful": 1, "skipped": 0, "failed": 0},
  "hits": {"total": {"value": 3,"relation": "eq"}, "max_score": 1,
  "hits": [
      {"_index":"cf","_id":"273b5cdc-f8f5-43f8-8de7-07b1be6146f4","_score":1.0,"_source":{"id":101}},
      {"_index":"cf","_id":"eb9de69b-b82f-4d06-b871-280a0f416f85","_score":1.0,"_source":{"id":102}},
      {"_index":"cf","_id":"84733c63-e2a6-4b4d-a82c-c74aa7a856f9","_score":1.0,"_source":{"id":103}}
    ]
  }
}
We have seen how to create and manage Apache Iceberg tables in Cloudflare R2 using the R2 Data Catalog, and how to integrate them with Mach5 Search for indexing and analytics. By enabling the R2 Data Catalog, creating API tokens, and connecting both the object storage and catalog connections in Mach5, users can seamlessly access and process Iceberg data stored in Cloudflare R2.
This integration allows organizations to efficiently turn data-at-rest in R2 into data-in-use within Mach5, unlocking advanced data discovery, analytics, and operational insights.